Showing posts with label Do-It-Yourself. Show all posts

Saturday, January 24, 2015

DIY Pattern Block Velcro Board

*Follow Me on Facebook, Pinterest, and Twitter*


So, it's no secret that I'm in love with dollar store cookie sheets. You can make all sorts of cool things, like this project, and this one (one of my most popular posts ever), and they're only a dollar meaning you can buy 2 or 4 or 17. They're also magnetic, which is great fun. (It's no surprise that magnets are one of my favorite things in the world, seeing as how Junior has one implanted in his head.)

Like magnets, Velcro is just fun. It makes things stick without making them sticky. I have issues with sticky things. Ick.

My kids love playing with blocks and making designs, and I knew there had to be a way to make blocks portable. We're in the car a lot, and Junior's been watching way too much Curious George on the DVD player. In an effort to get the theme song out of my head, and to keep him more actively engaged during car rides, I decided to take on the challenge of making blocks portable.

I ordered 15 feet of Velcro Stripsfrom Amazon (affiliate link), and also purchased some Velcro dots from an office supply store. I ended up using both the dots and strips...more on that below, but you really only need the strips.

Supplies:
We had a set of wooden pattern blocks from our math curriculum that I used to make this tray. We had 250 blocks in the set, and I probably only used 40 for this project, so we still have plenty left over for math.


First, measure out the length of the cookie sheet, and cut Velcro strips (you can use either side of the Velcro, but I did the pokier side for the board and the softer side for the blocks) to that length. Carefully attach the Velcro to the cookie sheet in one layer, making sure not to overlap the strips.

Once you've covered the cookie sheet with Velcro, get out the blocks you want to use. I used a variety of all the shapes. Probably about 40 in all. Take the opposite texture from the Velcro you used on the board (if you used the spikier side on the board, use the soft side for the blocks. If you used the soft side on the board, use the spikier side for the blocks.)

I used the strips on the board, and started using the dots on the blocks. But, I found they didn't stick as well, so I finished up using a little of the strips for each block. The strips seemed to stick better, but the Velcro itself didn't stick to the blocks as well because I had to pull so hard to get the blocks off. Tater said she preferred the dots better because they were easier to use. It's your preference.
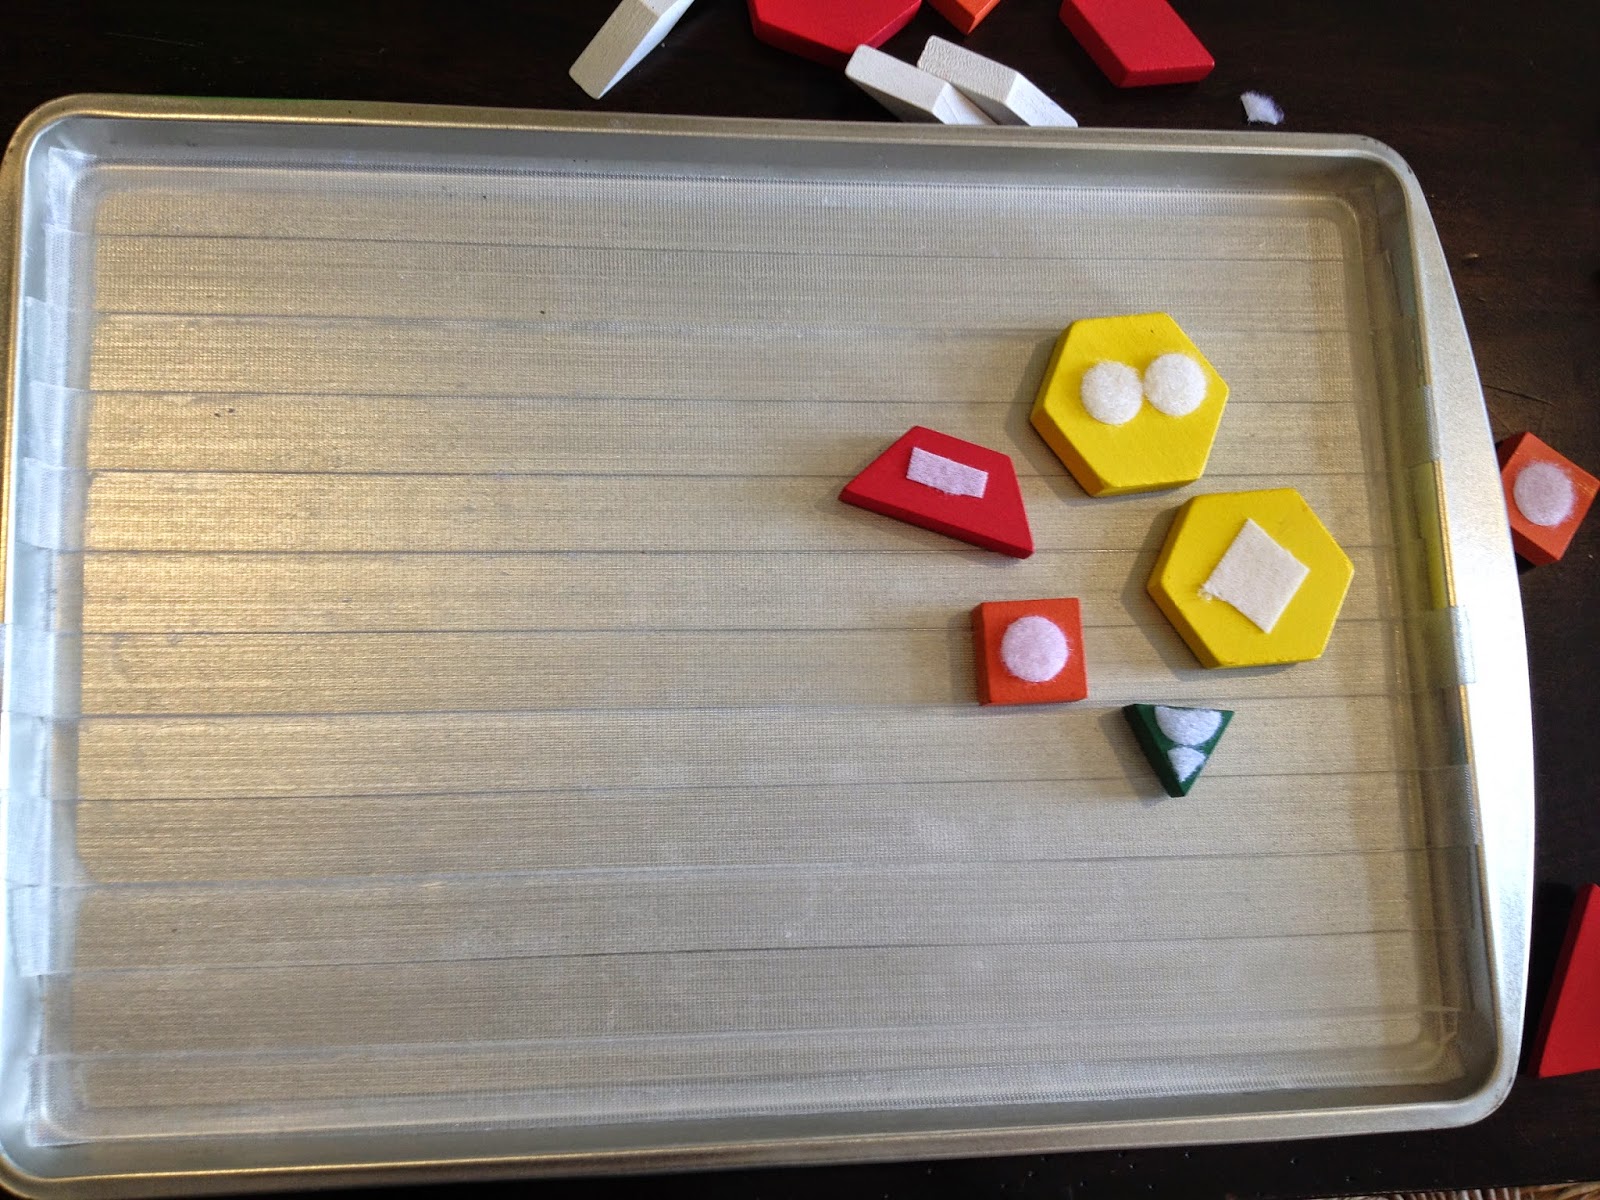

Once the Velcro is attached to the blocks, you're done! Store the blocks in a plastic bag, and make sure to keep the board clean, otherwise it won't stick as effectively.

I'm excited to add this to my Road Trip Must Haves for our next trip!

I'm linking up at Tater Tots and Jello and Flamingo Toes

Wednesday, January 14, 2015

DIY Valentine's Day Glitter Crayons

*Follow Me on Facebook, Twitter, and Pinterest*


Hi, my name is Sara, and I'm addicted to crayons.

Two years ago, my mother gifted me a 64-pack of Crayola crayons in my stocking. I still hoard them in my dresser, don't allow my children to touch them, and open them to smell their crayon-y goodness after a long day. Few things in this world are as pure and delightful as a box of brand new pointy crayons. Who wants to give me an "amen sister"?

Okay, so now that we've established that I have an unnatural love for school supplies, I'm going to show you how to make your own homemade heart shaped crayons. Because it's Valentine's Day. Who doesn't want heart shaped crayons for Valentine's Day?? And, they're super duper easy.

You only need two things. A heart shaped silicone mold and crayons. The heart shaped mold was at Michael's for $9.99, but I found a 50% off coupon, so it was only $4.99. The crayon bag is filled with all the broken/partially melted/restaurant freebie/Dollar Store crayons I hold onto for this very reason.


First thing you want to do is heat your oven to 325 degrees. Then, sort out your crayons. For this project, I used all shades of red, pink, purple, and white.


Next, you have to get those pesky little papers off. Either you can be smart and use a knife to slice the papers off, or you can be like me. It's possible I have purple crayon permanently lodged under my fingernail. It was a labor of love. How fitting.

Once all the pesky papers are off, snap your crayons into pieces and place inside the molds randomly.

Now comes the glitter. Glitter, glitter everywhere, on my floor and in my hair. True Story. Sprinkle your desired color (or colors) onto the broken crayon pieces. Tater chose the glitter, and she chose pink, purple, silver, white, and red.

Now, it's time to melt these babies! Stick them into the 325 degree oven (put the mold on a cookie sheet so it doesn't bend on the rack and give you uneven crayons), and allow to melt, about 15 minutes.

After about 15 minutes, they'll look like this...hot liquid.


Pull the cookie sheet with the mold on top out of the oven and let sit, undisturbed, until completely cool. This is crucial! Completely cooled I tell you...you can't rush love.

Or else you'll end up with a broken heart

So please, for the love of the crayons, don't release them from their heart shaped home until they're completely cooled. It should take about an hour.

Slip them out of the molds once cooled, and feel the love.


These are going to make a great Valentine's treat for Tater's friends. If she weren't homeschooled, I would totally make them for her class instead of giving candy. I'd tape them to pink card stock and write something witty like:

"I'm drawn to be your Valentine"
                                  
                                     OR
"I'm Cray-zy for you"
                                   
                                      OR
"You're Crayontastic"

So, that's it. That's how you make crayons...Cray-zy easy, right? (Sorry, couldn't resist.) Think of the possibilities for other holidays (I have a Christmas tree mold for Christmas, and a Star mold for 4th of July), and inexpensive party favors...you may become a crayon addict too. Not that that's a bad thing, though...


Wednesday, June 25, 2014

DIY Lego Travel Tray

Last summer's travel lap tray idea worked relatively well on our travels, but now that Stinker is really into Legos, and after I made the Lego Pattern Travel Game last week, I began to wonder if I could travel with Legos without worrying about them getting lost or thrown all over the place. Ah ha! It can be done!! A Lego Travel Tray. It takes 2 minutes to make, and only cost about $10. Now, Stinker can build some masterpieces on our next road trip or plane ride, and I won't have to wedge myself under the back seat searching for missing Lego pieces. Not that I've ever done that before. Especially not Wild Style's hair piece. Ahem.

Anyway, the shopping list is pretty straight-forward. You'll need:
  • Cookie Sheet (I get mine at the Dollar Store. They cost $1, and are about 9"x12".)
  • Lego Plate (This was the most expensive piece. I found one for $5.99, and it's a 10"x10".)
  • Magnetic Spice Containers (Michaels had these for $1.50 each, but I had a 15% off coupon)
  • Box Cutter (not pictured)
  • Super Glue or Hot Glue Gun (Not Pictured)
1. First, if you have a 9"x12" cookie sheet, you'll need to cut the Lego plate to fit the cookie sheet. Using a box cutter, apply firm pressure in a straight line, to cut off about 3 rows of raised dots. I actually cut off four, but start with three. Note: You'll want to run the box cutter through two or three times. The plastic will actually break off where the cut was, creating a nice, even cut. My amazing grampa did the cutting for me. Because he's handy like that. And because I can't cut a straight line to save my life.


2. Next, use Super Glue or a hot glue gun to attach the Lego plate to the edge of the cookie sheet. You'll want to leave room for the magnetic containers on the side. Allow to dry.


3. Fill magnetic containers with Legos, and place on the edge of the tray. Apparently I turned my tray between pictures. It was a Monday night after a very long Monday. I have no explanation.

4. Now you can enjoy Legos while traveling, and not have to wonder how Wild Style's hair piece could have possibly jumped out of the car because you scoured every square inch of the backseat and found nothing save french fries that may be older than your youngest child. Again, not that I've ever done that, but just a helpful reminder. Because I care. 

Join our Facebook Community

Pin this!! 


Tuesday, March 18, 2014

DIY-"Glass" Table Cover


Back when we were fortunate enough to have a Pottery Barn outlet in California, I found all sorts of great treasures. A few of my favorites included a velvet Christmas tree skirt for $13, a set of floor-to-ceiling curtains for $20 (regularly $200, and matched my bedroom perfectly!) and a kid's school room set--a bulletin board, desk, and bookshelf for around $100 total.

Since Stinker was just a toddler when I purchased the table, it was an art table for a while, and I sought to protect the wood from the disastrous effects of errant paint and over zealous glittering by covering it with a vinyl tablecloth. Messes wiped off easily, and it worked well. Until this year.

Now that Stinker is in school, I was looking for a way for the desk surface to be more accessible to allow for easier writing, (and more of a school desk feeling), but would still protect the table from scratches. 

Initially considering glass, I consulted my grampa (an former engineer and woodworker with his own little workshop), who suggested I look into plexiglass for the project. Not only was it significantly cheaper, but it also was safer for the kids...no shattering if it were to fall.

I measured the table (multiple times to ensure a perfect fit), and purchased a sheet of plexiglass from a home improvement store slightly larger than the table so I could make it fit (it cost less than $40). Then I found someone with a table saw (my awesome grampa!), and he cut the plexiglass sheet to fit the table perfectly. (My gramma and I helped. It was a team effort :))

Since plexiglass is lighter than glass, it doesn't sit on top of the table as easily, so I purchased a few wood-safe velcro strips that hold the edges of the plexiglass down without the use of adhesive.

I put paper under the plexiglass, and Stinker can use dry erase markers to practice her writing and letters without wasting paper.

Simply erase when done! I love our new table, and Stinker has enjoyed sitting at a "big girl" desk.


Follow me on Pinterest! 

Tuesday, January 7, 2014

DIY-Jeopardy Board


We're a few months into my first stab at homeschooling, and I have to admit that I'm really enjoying it. When I was little, I would sit my stuffed animals in a row, and play school. Sometimes I would dictate a spelling test to them, then quickly write the words on each animal's paper. Of course, I had my favorite animals that would always score 100%, and some less favorite stuffed animals that routinely "misspelled" their words. Having the opportunity to do school with Stinker has been both enjoyable and gratifying. She's come so far in the last few months, that the effort is definitely paying off.

One of the curricula we're using this year is Classical Conversations (CC). I like the Classical model, and Stinker loves learning through songs and games.

I've recently gotten Stinker hooked on Jeopardy, (I am, myself, a Jeopardy addict, so it's fun to watch it with her), so I decided to create a Jeopardy board to practice CC. It really couldn't have been easier to make.

I went to Lakeshore and got a tri-fold poster board, a pack of self-adhesive library pockets, and some self-adhesive name tags. I also had a pack of index cards laying around.

Hopefully you can multiply better than I can. (Apparently six categories times five questions per category requires more than 25 library pockets. I had to make a second trip.)

Lay out the name tags and library pockets as shown. The name tags will show the category, and the library pockets will hold the questions and show the value of each question.

Write the category and value as shown.

Write your questions on the index cards. I abbreviated the category and put the value of the question on top as a way of keeping score and keeping organized. 

To play with one child, have them choose a category and point value, and ask the associated question. If they get it correct, put the card in one pile. If they get it incorrect, put the card in another pile. At the end of the game (I usually ask about 10-15 questions, or at least one question from each category per game), subtract the cumulative point value of the incorrect answers from the cumulative point value of the correct answers to come up with a final point total. There can be actual prizes for winning, or just "Yay! You got 1000 points. Great job!"

To play with more than one child, play as in an actual Jeopardy game, putting questions aside in separate correct and incorrect piles to determine final point score.

Join our Facebook Community for more ideas and tips!

Monday, December 30, 2013

Top 10 Posts of 2013

For our family, 2013 was definitely better than 2012 (read a little about our 2012 here), but it was far from perfect. We experienced the joy of Junior getting to hear for the first time, but there is still concerns about what his future will hold. I have learned so much this year...namely contentment in the midst of struggle, and practicing faith instead of fear. Here are my top 10 posts from this year...I look forward to sharing more with you in 2014, and have some fun new series planned.

10. Deep Dish Skillet Pizza

9. Saving Money Eating Organic

8. An Update, An Apology, and Encouragement

7. Living Joyfully...Paradise Hidden

6. My Favorite Things at Trader Joes...Snacks and Chips

5. Make it Or Buy it? Jewelry Cleaner


 4. 8 Non-Food Items You Should Buy at Costco

 3. DIY Travel Lap Tray

2. 8 Frugal Things to Do With Eggs
 
1. Junior's Story Part 1, Part 2, Part 3

We'd love for you to join our Facebook Community, and look for us on Pinterest! Thanks for reading, and see you in 2014!

Sunday, April 7, 2013

DIY: Travel Lap Tray

I'm really excited about my DIY project today!

Stinker likes to draw/color/write in the car, but inevitably, it makes a mess and markers go everywhere whenever I make a turn. So I decided to make a contained tray that would allow her to keep all her projects in one place.

I purchased a cookie sheet from the dollar store. I found a notebook on clearance at Michaels, as well as adhesive magnetic strips, and found a small container and mini dry erase board erasers in the Target Dollar Spot. I had washable dry erase markers on hand, but you could use any markers. They don't have to be dry erase. The cookie sheet is a great surface to write on...simply erase with a dry erase eraser or a damp paper towel.

I merely cut the magnetic strips to size and attached them to the notebook and small container, then stuck them to the cookie sheet. That's it! You can also place the magnetic adhesive on other things, such as action figures or blocks*.

*Magnets are a choking hazard. Make sure your child is supervised while playing with anything that has a removable magnet. Ensure the magnet is properly affixed to the toy before giving it to your child. 

Stinker is going to be so excited when I give it to her. She might even bring it everywhere we go, and not just use it in the car!


Price: 
Cookie Sheet....... $1.00
Small Container.....$1.00
Notebook.............$0.50
Dry Erase Erasers.$1.00
Magnetic Strips....$1.79 (though I only used about a third of the bag, I'm including the full price.)
-----------------------------
Total...................$5.29

Come Join our Facebook Community!

Tuesday, January 22, 2013

Make it or Buy It? Jewelry Cleaner

With all the hand washing going on around here lately, my rings were getting all soap scummy and dull. Remembering the last time I used storebought jewelry cleaner, I spent $6 and had an allergic reaction that caused all the skin around my rings to peel off, I decided to look for a DIY option that would get my rings sparkling again. I had been using toothpaste and an old toothbrush, but I wasn't sure all the chemicals in the toothpaste were good for the metal in the rings.

While reading my recent issue of Real Simple magazine the other day, I found an excitingly simple recipe for cleaning jewelry, and decided to test it out. So, here it is!

-2 parts dish soap (I used 2 TBS Dawn)
-10 parts warm water (10 TBS)

Let soak for 3 hours. Remove jewelry and gently scrub with an old toothbrush. Rinse with hot water. 

So, how did they turn out? Unfortunately, I forgot to take a "before" picture, but there was definitely a difference. The rings were shinier, sparklier, and the soap scum from all the preventative hand washing was washed away.


I don't even know how much 2 TBS of dish soap costs...maybe a penny or two? Either way, compared to the expensive jewelry cleaner in the stores, this method is definitely a winner.

Bottom Line: Make It!

Browse other "Make it or Buy It" articles here

Join the Save Money, Live Joyfully Facebook Community

Popular Posts