Showing posts with label homeschool. Show all posts

Sunday, February 1, 2015

11 Super Awesome Perks of Homeschooling


Follow Me On Facebook, Pinterest, and Twitter


I love homeschooling. I really, really do. We have chosen to homeschool our kids for several compelling reasons, and I'll admit it is a lot of work, but there are also some super secret awesome perks to homeschooling! Here's my list:  

1. No School Traffic. It's a little known fact that each time you get stuck in school traffic it takes approximately 47 seconds off of your life. I'm reducing my stress and my risk for a school traffic induced cardiac event by homeschooling.

2. I Have a Realllllly Good Excuse as to Why My House is Never Clean. (They're always with me...when would I have time to clean!?)

3. We Can Take Vacations in the Middle of the School Year. Since school started in our district last year, we've been to Connecticut, New York, San Francisco, and will soon take a road trip to Zion National Park. Traveling when other kids are in school is a huge benefit, and means cheaper hotel rooms and flights (not going during peak season), and less crowds.

4. We Can Sleep In. Waking Tater up out of a deep sleep is like waking up a hibernating bear. It starts the whole day on the wrong foot. Letting her sleep until she's ready to get up ensures no Tater Bear and we all live in harmony.

5. No Make Up Work. If Tater is sick, we wait until she's healthy enough to do studies. No racing against the clock trying to make up worksheets, and no risk of missing out on something.

6. Feeding My Book Addiction in the Name of Education. When I see a really cool world atlas at Costco, well, I have to buy it. You know, for school. Same thing for craft supplies. I have a craft supply problem. But it's for art class, so it's okay.

7. We Never Get an Email That Says: "The Whole Class Has Lice". My kids have good immune systems and are exposed to plenty of germs from doctor's offices (Junior has SO many appointments), playgrounds, neighbor kids, and sports, but we also have the option to isolate if we need to.

8. I Don't Have to Ask "What Did You Learn Today?" And, if she says "nothing", well, I'm more than happy to add some more work =)

9. We Can Do Schoolwork Outside. Or at the Beach. Or Basically Anywhere. We live in San Diego. If we want to sit outside on Wednesday at 10am and soak up the 74 degree sunshine, we can, and we can still get all our work done.

10. Field Trips. Legoland? Sure, let's talk about engineering. The Zoo? Okay, we'll talk about the habitats of animals. The park for a picnic? Help me measure out ingredients for our pasta salad...water boils at what temperature? Even with all the structured curriculum we use, there's still plenty of time for fun, educational outings. And I don't even need to sign a permission slip.

11. I Get More Time To Spend With My Babies.  As much as they exhaust me, I genuinely enjoy spending time with my kids. They're growing up so fast, and I'm grateful I get to spend my days with them.

Saturday, January 24, 2015

DIY Pattern Block Velcro Board

*Follow Me on Facebook, Pinterest, and Twitter*


So, it's no secret that I'm in love with dollar store cookie sheets. You can make all sorts of cool things, like this project, and this one (one of my most popular posts ever), and they're only a dollar meaning you can buy 2 or 4 or 17. They're also magnetic, which is great fun. (It's no surprise that magnets are one of my favorite things in the world, seeing as how Junior has one implanted in his head.)

Like magnets, Velcro is just fun. It makes things stick without making them sticky. I have issues with sticky things. Ick.

My kids love playing with blocks and making designs, and I knew there had to be a way to make blocks portable. We're in the car a lot, and Junior's been watching way too much Curious George on the DVD player. In an effort to get the theme song out of my head, and to keep him more actively engaged during car rides, I decided to take on the challenge of making blocks portable.

I ordered 15 feet of Velcro Stripsfrom Amazon (affiliate link), and also purchased some Velcro dots from an office supply store. I ended up using both the dots and strips...more on that below, but you really only need the strips.

Supplies:
We had a set of wooden pattern blocks from our math curriculum that I used to make this tray. We had 250 blocks in the set, and I probably only used 40 for this project, so we still have plenty left over for math.


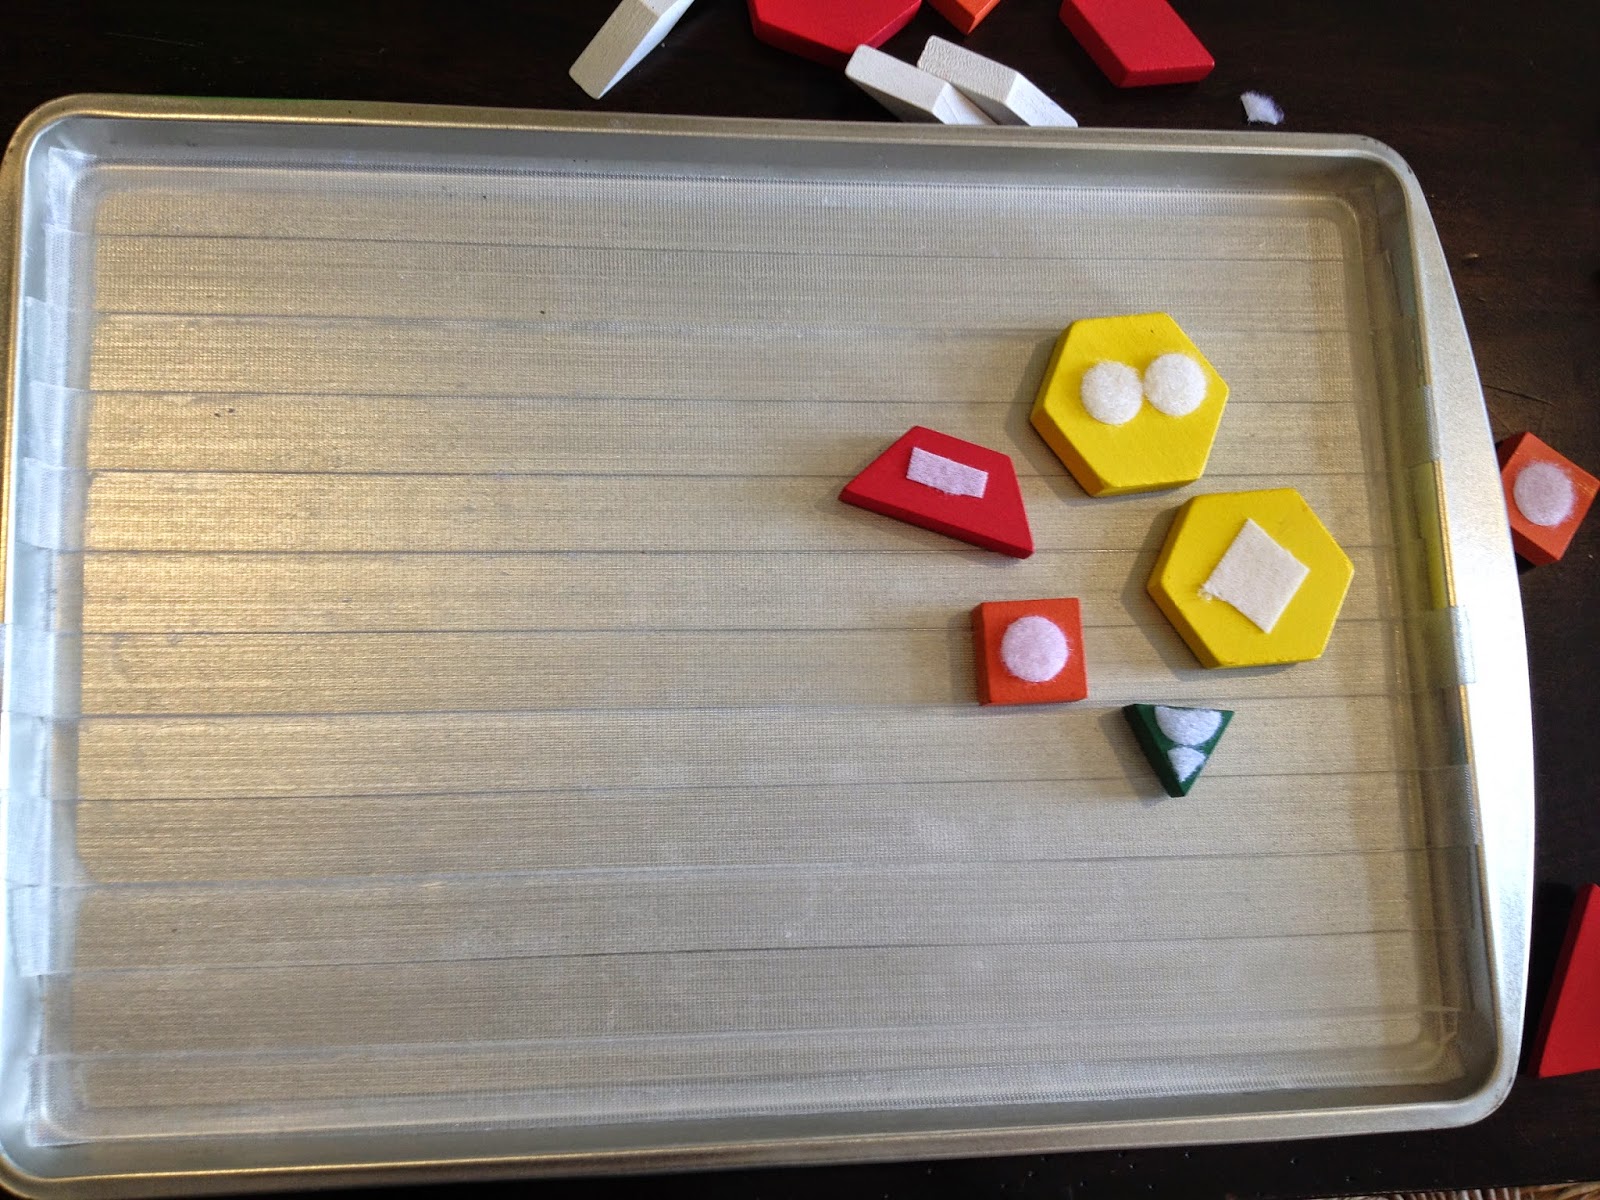
First, measure out the length of the cookie sheet, and cut Velcro strips (you can use either side of the Velcro, but I did the pokier side for the board and the softer side for the blocks) to that length. Carefully attach the Velcro to the cookie sheet in one layer, making sure not to overlap the strips.

Once you've covered the cookie sheet with Velcro, get out the blocks you want to use. I used a variety of all the shapes. Probably about 40 in all. Take the opposite texture from the Velcro you used on the board (if you used the spikier side on the board, use the soft side for the blocks. If you used the soft side on the board, use the spikier side for the blocks.)

I used the strips on the board, and started using the dots on the blocks. But, I found they didn't stick as well, so I finished up using a little of the strips for each block. The strips seemed to stick better, but the Velcro itself didn't stick to the blocks as well because I had to pull so hard to get the blocks off. Tater said she preferred the dots better because they were easier to use. It's your preference.


Once the Velcro is attached to the blocks, you're done! Store the blocks in a plastic bag, and make sure to keep the board clean, otherwise it won't stick as effectively.

I'm excited to add this to my Road Trip Must Haves for our next trip!

I'm linking up at Tater Tots and Jello and Flamingo Toes

Monday, January 5, 2015

First Grade Curriculum Choices: MIDYEAR UPDATE

*Follow me on Facebook, Pinterest and Twitter*

One of my most popular posts this year was the curriculum we chose for Tater's first grade year. But now our curriculum looks vastly different than it did at the beginning of the year! We've made so many changes that I figured another post was in order to let you know what we've liked and haven't liked from the original list. (Make sure you check out my original First Grade Curriculum Choices here.)

Mystery of History Volume I-I'm still enjoying this, although there is a lot of reading that can be dry at times, so I'm not sure how much Tater is actually retaining. She likes the activities, and I love that it's biblically based and interactive. I've supplemented with library books to bring more depth into some of the topics, but we're continuing with this curriculum for the remainder of the year and will reassess for next year.

Horizons Math 1-This was one of the only math curricula I could find that wasn't common core, which was a major reason I chose it. Tater has breezed through it...she can do the worksheets independently and hasn't really needed any help. I'm not sure if that's a good thing or a bad thing. There is definitely a lot of review built in, which is good, but I don't find it challenging enough. I'm not sure if we will continue with this math for second grade, but we will finish the first grade book then decide from there.

Horizons Phonics K-Tater seemed to be a little behind in reading to start the year so I put her in kindergarten phonics, but we made it halfway through this workbook only to realize that it was becoming way too easy. An official reading assessment from my aunt (who is a first grade teacher) showed that she was above 2nd grade reading level, so we dropped Horizons Phonics K and have moved into First Language Lessons for the Well-Trained Mind as well as a reading comprehension workbook I picked up at Lakeshore. So far we are loving First Language Lessons.

A Reason for Handwriting-We are still using these worksheets, but Tater's handwriting is still terrible. I'm considering dropping the Handwriting curriculum to just focus on copywork and letter practice.

A Reason for Science-We are only using this about one week out of five. I haven't thought the lessons were that clear, so I had to explain quite a bit that wasn't mentioned in the text. Most of the time we are just doing experiments from Magic School Bus Science Club (Tater's birthday present last year), and some science kits she got for Christmas. I also picked up a Natural Science visual encyclopedia and she does daily journal entries about different plants and animal species.

God's Great Covenant-Since Mystery of History has a lot of lessons on Biblical history, we have dropped God's Great Covenant for now and are just using a combination of MOH and a Bible Storybook. Perhaps when she gets older I will revisit God's Great Covenant, but I would prefer to focus on the stories and God's character more than the dogma at this age.

All About Spelling-We are now in book 2, and I can't say enough about this curriculum. Tater is turning into a really proficient speller because she is learning the rules of spelling instead of random words. I plan to continue All About Spelling for the foreseeable future. Although, I will admit I've been using the tiles less and less, and have been using a whiteboard instead. 

Classical Conversations-We still meet with our CC group once a week, but review time is basically just during class day and sometimes the CD in the car. I don't think we are going to continue with CC next year, just because our current curriculum is already more than enough.

Road Trip USA-I enjoy this curriculum put out by Confessions of a Homeschooler, and we will be continuing it. I like all the activities included, although printing everything out was a huge task.

World's Greatest Artists-Tater likes the art projects in this curriculum from Confessions of a Homeschooler, but I'm not sure we needed a whole curriculum, plus the companion books have been difficult to find. Just printing out examples from each artist along with a painting project will be good enough moving forward.

Read Alouds-We have finished these read aloud books since September...Little House on the Prairie, Davy Crockett: Young Rifleman, two Boxcar Children books, and Prince Caspian.

Pin This... 


See All My Homeschooling Posts

Monday, December 29, 2014

Top 10 Posts of 2014

Wow. This year is already coming to an end. How does this happen?! As soon as I get used to writing the year, it changes. Oh well. My genuine hope for all my readers is that 2015 will bring many blessings and joyous moments.

To wrap up the year, here are my 10 most read posts this year...I've got some great new posts coming in 2015...thank you so much for following Save Money, Live Joyfully!

1. You Know You're a CI Parent If...


2. Dear Lady Who Told My Deaf Son to Be Quiet


3. DIY Jeopardy Board


4. Slow Cooker Recipe Collection


5. Lego Patterns Travel Game- Free Printable


6. Find a Homeschool Schedule That Works for Your Family


7. DIY Lego Travel Tray


8. Our First Grade Curriculum Choices


9. Tips for Entertaining on a Budget


10. 30 Life Lessons for My 30 Years

Tuesday, December 16, 2014

20 Household Objects for "Inventor" Kids


My 6 year old, Tater, is a natural born inventor. From the infamous "baby slingshot" she invented when Junior was a newborn (a prototype I did not allow her to test out), to the more recent new and improved "up-the-stairs-diaper-lifter" (a good idea, but not a particularly hygienic design), she's always been one to tinker.

Here are 20 household items I always try to have on hand for her when she gets a creative bee in her bonnet and wants to invent something. Putting the little, loose items together in a cute container makes it extra easy for her to grab when she's bored.

You'll be amazed what creative contraptions your child will come up with...the possibilities are endless, even with these common and somewhat random household objects. When your child is done, you can either toss everything or recycle the items for the next creation.

Most of these things can be found at the dollar store, and if packaged right, would make a really cute DIY gift.

*Certain listed items could be a choking hazard and are recommended for children aged 5 and up. Please supervise children at all times.

1. Rubber Bands
-all different sizes and colors 

2. Paper Clips
-the big clippy ones are extra fun

3. Bottle Caps
-save the caps from your water bottles and juice gallons for different sizes

4. String
-a ball of endless wonder!

5. Tape
-what is it with kids and tape?! 

6. Straws
-we love the big smoothie straws, although the flexible ones are useful too

7. Plastic cups
-paper cups work too

8. Paper plates
-extra points for colorful paper plates

9. Wooden Spoons
-get a pack of them at the dollar store

10. Single Hole Punch
-how else is string supposed to fit through a paper plate?

11. Markers
-for decorating the invention

12. Paper 
-for drawing a model/design

13. Wooden Chopsticks
-who knew!?

14. Paper Muffin Liners
-yes, really...

15. Empty Plastic Containers
-wash out those sour cream and yogurt cups

16. Popsicle Sticks (Craft Sticks)
-one of the best "creative" supplies you can get

17. Cotton Balls
-every invention needs a little padding

18. Metal Washers
-these are super inexpensive at hardware stores

19. Plastic Spoons
-one word: catapult

20 Aluminum Foil
-these turn into balls, wrap thing, become a cover...more useful for the kids than for me!


Pin This!


Follow Save Money, Live Joyfully on Facebook, Pinterest, and Twitter!

Thursday, November 20, 2014

FREE $10 Credit to Educents=FREE Learning Activities!

 
Educents is the premiere and most trusted Daily Deal site for educational toys, games, and activities. Often, Educents will even offer activities or curriculum at a 100% discount. These free worksheets are perfect for our homeschool or for keeping Tater occupied while we're in the car!

They also offer deep discounts on learning games and toys--perfect for Christmas gifts. 

For the holidays, Educents is offering a special deal. If you join Educents here (it's free), you'll receive a $10 credit...no minimums...and many things are under $10, so you can get some great toys, games, or activities completely FREE!

Keep checking Educents for some useful activities and great deals...new offers start daily!

*This post contains an affiliate link

Monday, November 3, 2014

Post Roundup-October 2014

I can't believe it's November already. It seems like October just flew by! It was a busy month here. I turned 30, we took a family road trip, and Junior got a big boy bed! Here are all my posts from the month of October.

About Me

Special Needs

Kids Fun and Activities

 Homeschooling

Recipes
Book Reviews

 Come Visit Me on Facebook, Twitter, and Pinterest!

Sunday, October 26, 2014

Surprise Ice Cubes Sensory Activity

As I've mentioned before, we've been helping Junior work through his sensory processing issues caused by his deafness, and part of that is creating many opportunities for him to experience a lot of different textures through play.

This weekend, in a moment of blazing Mommy Glory, I got out the well-loved sand-water table and filled half of it with water, and the other half with dried beans. I imagined my children gently playing with the water and running their hands through the beans while giggling in delight. I then imagined them playing outside for an hour while I cleaned the house, then we would all meet inside for hot cocoa and freshly baked cookies.

Hahahaha. Hahaha. Ahem. HAHAHAHA.

This is what happened after 10 minutes. We had to order a ShopVac. Not joking. By the way--wet black beans stain concrete. 

Soooooo, I decided to find some less messy sensory play ideas. Because I have better things to do than pick dried beans out of grass. Junior loves playing with ice, so I wondered how I could turn ice play into a sensory rich activity. I found a few ideas for ice drawing, ice cube shapes, and freezing toys inside of ice cubes. Perfect.

All you need is an ice cube tray, water, and some small toys or craft supplies.

I couldn't find my big ice cube tray, so I had to use a tiny one, but it had different shapes, so it was fine. I placed one item in each little slot and filled it with water, then froze it. After a couple hours, I gave them to the kids to play with...outside, of course. They held them and played with them until the ice melted and they were left with a surprise!

Here's a picture of how they turned out.

Here are some ideas for ice cubes tray fillers: 
(*always keep an eye on your children to make sure they don't put any small items in their mouths once the ice melts. Consider the age of your children when using items that could be a choking hazard.)
  • stickers
  • glitter
  • buttons
  • marbles
  • small plastic animals
  • beads
  • feathers
  • bouncy balls
  • wooden letters and numbers
  • craft pom-poms
  • fruit such as cut grapes or strawberries (for an edible surprise)
Follow Save Money, Live Joyfully on Facebook, Twitter, and Pinterest

Pin This! 


Linked up at: A Mama's Story, Enchanted Homeschooling Mom, Mom's the Word, and Parenting and Homeschooling in Faith

Thursday, October 9, 2014

Homeschooling When Your Child is Uncooperative

Both of my children are what you would consider "spirited". Other terms for their personality include "strong-willed", "persistent", and "determined". These are traits that will serve them well in the future--working diligently towards their chosen professions, confidence in relationships, and staying true to their values despite peer pressure.

However, right now these "positive traits" come across as stubborn, hard-headed, and uncooperative. And, for a homeschooling family, teaching one (or more) of these children can be downright exhausting. Everything becomes a battle and an argument, and one page of reading turns into a hour, as the spirited child simply won't do something they don't want to do. How do you keep homeschooling a smooth and enjoyable experience when your child is constantly disagreeable?

Four things have been helpful for my family: Respect, Options, Motivate, Engage. (ROME)

1. Respect Your Child's Opinions, But Never Tolerate Disrespect
A child should be able to share their opinions and give their feedback about the school day, but it should always be done in a respectful way. If respect becomes optional, your child will likely take advantage of your authority, and there's no easy solution there.

I show my daughter respect by taking her opinions about our curriculum into account and compromising with her when it's appropriate. However, she also knows that I have the final word. When she feels like her opinion actually matters, she doesn't fight my authority as much.

2. Give Your Child Choices
When we first started homeschooling, I would say "It's time for school", which was immediately followed by "Awwwwww. No!!!" Every. Single. Day. So exhausting. So, I started giving Stinker some control over her school day. Here are some of the things she gets to choose:
  • In which order she wants to do the subjects (provided each subject is there)
  • Where she wants to sit (at the school desk, at the dining room table, outside, etc)
  • What kind of writing utensil she wants to use (you laugh, but sometimes letting her write with a rainbow pen or a purple scented marker puts her in a more agreeable mood.)
  • When she wants snack and break time (sometimes she gets uncooperative because she's hungry or has too much energy. Five minutes of running around outside, or eating a healthy snack can help her come back in and focus.)

3. Find Your Child's Motivation
Different kids respond to different forms of motivation. Note this isn't bribery--it's simply a way to connect with your child to help them do their best. Here are some ideas for motivating your kids:
  • Verbal Recognition (such as "Great job! You've been working so hard. I'm really proud of you!)
  • Earning Rewards (a star chart is a good idea for this. For each subject completed or each day done without complaint, a child receives a star. A certain number of stars gets him or her a small prize or a privilege.)
  • Independence (as noted above, many children want to feel like they're in charge of their schedule. If independence motivates your child, give her one subject per day to teach you. She gets to be the teacher and feels like she's in charge, but she's also showing you her mastery of the subject if she can adequately explain it, and that's the point of all your curriculum anyway.)

4. Use the Flexibility of Homeschooling 
One of the best parts of homeschooling is having flexibility--both in schedule and in curriculum. Now, I lean towards Classical curriculum--we learn Latin and do geography and memorize math facts and learn all sorts of stuff that many would consider "boring". But, I also know that my kids are kinesthetic learners--they learn by doing. So, we do a lot of hands-on projects, that keep my daughter interested and engaged.
  • We're not bound to do pages 141-143 in our science workbook when we can go outside and do an actual experiment that explains the scientific concept. 
  • We don't have to sit and learn Latin by reading a list of words when we can do a play about being Ancient Romans speaking their native tongue. 
  • Go on field trips--keep a Field Trip Journal and have your child write entries in it--this counts as handwriting and grammar.
  • Do math problems outside with sidewalk chalk--then use the answers for a scavenger hunt.
  • Make geography more relevant by writing to friends and family who live in other states--ask them to send photos, post cards, and brochures. 
Schoolwork isn't always going to be "fun". It shouldn't be. There are often things in life we have to do that aren't fun, but they're necessary, and teaching a child a strong work ethic will prepare him for real life. But, there are also times that we need to remind kids that homeschooling is a privilege, and there are benefits to having the flexibility they wouldn't have in a traditional school setting.

By using the ROME tips (Respect, Options, Motivation, Engage), I hope you can bring some peace into your homeschool, even when your kids would rather work against you than with you.

Join our Save Money, Live Joyfully Community

Browse my other Homeschooling Articles HERE 

Pin This!


Saturday, October 4, 2014

Post Roundup-September 2014

I thought it would be fun and helpful for my readers if I did a post roundup every month, and divided everything into categories for easy access to all the recipes and articles I put up. What do you think? Is it helpful to post a roundup every month?

Special Needs/Junior

Recipes

Homeschool

Saving Money

Book Reviews

Make sure you continue to see all my posts! Get My Posts Emailed to You!
Join our Facebook Community or follow me on Pinterest! 

Pin This!!


Monday, September 22, 2014

CC Classical Conversations: Giant Board Game Review

I've been tasked with coming up with review games for our CC class this year, and I. Love. It. It's so much fun to come up with new ideas, and watch the kids play and learn at the same time.

This Giant Board Game is so simple. I purchased some blank foam dice (if your dollar store doesn't have them, Lakeshore will), and used one to write numbers like a typical die, and the other to write the CC subjects (minus timeline). You'll also need some paper. I used brightly colored construction paper just to keep the kids interested, but you can use any paper you want. I used 12 sheets for 7 kids (each kid should get 2-3 turns).


Just lay out your paper like you would a game board, with some space in between. If the kids are older and more into competition, you can label some sheets with "miss a turn", "roll again", or "go back 2 spaces", etc. I just kept them blank for the sake of the younger kids.

Each child rolls the dice, and is asked a question from the subject he or she rolled. If it is answered correctly, the child then moves forward however many spaces the number die says, and stands on the corresponding piece of paper/board space. First child to reach the end wins.

This was definitely a fun game, and the kids stayed attentive throughout the entire thing!

Pin This! 


Join our Facebook Community
Check out my other CC Review Games HERE

Sunday, September 7, 2014

Beating Homeschool Burnout Before It Begins


It's the beginning of the school year for many (unless you've been working year-round), and the excitement of new pencils, markers, notebooks gives most of us a ready-to-go attitude.

But whether you're a new homeschooling family or a longtime veteran, after a few weeks or months, you'll notice the excitement will fade and school will be just another thing to cross off your daily list of chores. This is burnout, and it's common, but is there anything you can do to avoid it?

1. Start Slow
You may super excited to crack open that new book and pack as many lessons into as short a time as possible, but for the first few weeks of classes give plenty of recess and play time and keep lessons short. Slowly ease back into the routine.  

2. Take Breaks When You Need Them
Some parents beat the burnout by scheduling one week off for every 4 to 6 weeks of school, while other parents just opt to take a day off once in a while when they sense their family needs it. Don't stress about taking a break here and there. Your kids will get a lot more out of their lessons if they have a good attitude than if you're forcing them to sit just so you can put a pretty "completion" sticker in your subject planner.

3.Do More Hands-On Activities
When you start to feel burnout coming on, bench the busywork and add some fun hands-on activities to your schedule instead.

Are you studying Ancient Rome? Explore what it was like to live as a Roman. Dress in costume, make authentic recipes, or build a model of a Roman home.

Need to tackle that spelling list? Hide plastic letters in the backyard and have the kids run around searching for the letters they need to spell their words.

Make up songs to memorize grammar rules, do a science experiment, (Educents has great deals on hands-on activities for kids of all ages, affiliate link), or try to paint your own Picasso or Monet while studying their art styles. School won't always be "fun", but homeschooling gives you the flexibility and freedom you need to present the information in new and engaging ways.

4. Vary Where You Do School
When Stinker won't sit still and complains about doing any work, I know it's time to change our surroundings. Sometimes that's as easy as taking our reading outside to the backyard or to the couch. Sometimes it means a field trip to the aquarium or Zoo where we have passes. Your child is not confined to his or her desk, and they will be more open to absorbing new information if you change up the scenery at times.

By taking advantage of homeschooling's flexible schedule, you can avoid burnout and keep your family learning happily all year long!

Join our Facebook Community

Pin This!


Monday, August 11, 2014

Chapter Book Read Alouds...Tips and Our Favorites

It's amazing how much stronger Stinker's vocabulary has gotten since I've started implementing read-alouds as part of our homeschool curriculum. Research consistently proves that reading to children is one of the most effective ways to strengthen the neural pathways in their brains, allowing them to learn quicker and retain more. Since January, I have read 10 chapter books out loud to Stinker.

Here are a few ways to find a good chapter read aloud for your student or students:

1. Start With the Classics...Adapt if Necessary
They're classics for a reason. Books from Charles Dickens, Jules Verne, and Alexandre Dumas have all stood the test of time. If your child is a little young for some of the subject matter, use an adaptation specifically for young readers. The writing of the older books is stronger than newer books, and the vocabulary is much larger. The stories are also a lot of fun.

2. Make Reading a Priority
Read a chapter while the kids are eating breakfast, read while your child is in the bath. Set aside time every day to read. Help instill a love for reading now, so your child will be a lifelong learner.

3. If a Book Isn't For You, Don't Be Afraid to Stop It 
If you've started a book that's boring or that your child isn't interested in, don't be OCD like me and refuse to start a new book until you've finished the boring one, trudging along just to get through it. In the younger grades, it's most important to associate enjoyment with reading, not duty.

Here are the books I read out loud to Stinker last year:
  • The Lion, The Witch and The Wardrobe
  • Imagination Station #1-4
  • Boxcar Children #1-3
  • The Wizard of Oz
  • Little House in the Big Woods (Little House on the Prairie series #1)
Here is our list of books to read this year (First Grade)
  • Little House on the Prairie (plus additional in the series)
  • My Side of the Mountain
  • Swiss Family Robinson
  • Black Beauty
  • Oliver Twist
  • Chronicles of Narnia (continuing the series)
What are some of your favorite read alouds?

Join our Facebook Community!

Pin This


Tuesday, July 22, 2014

Kid's Craft...Felt Funny Faces

I love doing art projects with felt. It's cheap, colorful, and you can do just about anything with it. When Stinker was little, I made Felt Cookies for her to decorate, and she still pulls it out to play with on occasion. Since Junior has been learning the body parts in speech therapy, I thought it would be fun to make a felt face game for him to practice naming facial features.

You'll want to get a bunch of different colors of felt...each piece is only about $0.20, and different colors makes it more fun, I think.

Start by cutting a head shape out of a light colored piece of felt...I just free drew it, so it's a little off, but the kids shouldn't notice =) 

Then, cut out a bunch of shapes for the eyes, nose, ears, hair, mouth, and miscellaneous (eyebrows, earrings, mustache, etc). I did a half dozen of each body part in various colors. The mix and match is fun. Divide each type of facial feature into different baggies if you want, or just put them all in one big bag and let the kids design away! The results are fun...and sometimes a little creepy...but I love watching my kids be creative!

After they've designed their face, encourage your child to name his or her character, and tell a story about their character.


Browse my other Kid's Craft Projects

Join the Save Money, Live Joyfully Facebook Community

Pin This!


Wednesday, July 9, 2014

Homeschooling...A Day in The Life


One of the most common homeschooling questions I get is "How long does school take every day?"

Well, there's a short answer and a long answer to this one. I'll start with the short answer first: As long as it takes!

The long answer is a little more involved, but it really depends on the age of your child and your teaching style. Obviously, a 4 year old will have much less structured school time than a 12 year old. Since I'm only homeschooling a first grader, I'll share my experiences in school work thus far:

For preschool, plan to spend 30-60 minutes on "school" per day (I say "school" because it's really just a few structured activities and games at this age, and not a formal curriculum.)

Kindergarten-1-2 hours per day

1st grade-3-4 hours per day

Here is a typical school day for our family. It's not super traditional, because Junior needs a lot of attention, and we just can't get everything done while he's awake.

7am-Wake up. The kids come into my room and watch Sesame Street while I take my time waking up, showering and getting dressed.

8am-Breakfast

8:30am-Clean up breakfast dishes, load and unload the dishwasher. Kids play in the family room.

9:00am-Speech Therapy with Junior. Either with an in-home therapist or just with me. Stinker gets free time while we work with Junior.

10:00am-Errands or appointments for the day. If there is nothing to be done, Stinker starts on independent work she can do herself, like a reading page or handwriting worksheet while I keep Junior occupied.

11:00am-Reading aloud time while the kids have a snack. (Right now we're reading Little House on the Prairie and Stinker loves it!)

11:30am-Outside play time

12:00pm-Lunch

12:30pm-Clean up lunch dishes, put Junior down for a nap. Start school with Stinker.

12:45pm-Math Lesson for the Day

1:15pm-Bible free reading (Stinker and I both sit with our Bibles and read to ourselves) and Bible study for the day.

1:30pm-Science Lesson for the Day

1:45pm-Art or Geography...I alternate them every other day

2:00pm-History Lesson for the Day

2:15pm-Reading Lesson for the Day, and Stinker reads aloud to me

2:45pm-Spelling Lesson for the Day

3:00pm Get Junior up from his nap, kids have a snack (Sometimes he's awake before 3pm, but I'll run upstairs and give him some toys to play with in his crib while I finish up with Stinker)

3:30pm-Kids play in the play room or outside while I make any necessary phone calls or answer emails

4:00pm-Start dinner while kids watch TV or a show on Netflix

5:00pm-Try to clean up so my husband doesn't come home to a disaster. Operative word: Try

5:30pm-Eat dinner

6:00pm-Finish any outstanding schoolwork with Stinker while my husband plays with Junior

7:00pm-Start getting the kids ready for bed

8:00pm-It's finally quiet! I clean the kitchen (or thank my husband for cleaning the kitchen), and sit down for the first time that day. My husband and I usually watch a show or chat.

10:00pm-I hop in bed and read for a while until I finally fall asleep and do it all again tomorrow!

So, all told, Stinker (1st grade) does about 3 or 4 hours worth of school work on any given day. Sometimes more, sometimes less depending on how much she drags her feet, but most subjects take about 15 minutes to complete. Math and reading are a little more involved, so we spend about a half hour on each of those. This isn't how everyday looks, but it's a good guideline for what I try to do.

The best part about homeschooling is that you can create your own schedule based on what works for your family. As Junior gets older and is able to participate more, I will probably try to get all our schooling done in the morning when minds are fresher and take the afternoons off.

Browse all my Homeschooling Posts

Join our Facebook Community

Pin This!


Wednesday, June 25, 2014

DIY Lego Travel Tray

Last summer's travel lap tray idea worked relatively well on our travels, but now that Stinker is really into Legos, and after I made the Lego Pattern Travel Game last week, I began to wonder if I could travel with Legos without worrying about them getting lost or thrown all over the place. Ah ha! It can be done!! A Lego Travel Tray. It takes 2 minutes to make, and only cost about $10. Now, Stinker can build some masterpieces on our next road trip or plane ride, and I won't have to wedge myself under the back seat searching for missing Lego pieces. Not that I've ever done that before. Especially not Wild Style's hair piece. Ahem.

Anyway, the shopping list is pretty straight-forward. You'll need:
  • Cookie Sheet (I get mine at the Dollar Store. They cost $1, and are about 9"x12".)
  • Lego Plate (This was the most expensive piece. I found one for $5.99, and it's a 10"x10".)
  • Magnetic Spice Containers (Michaels had these for $1.50 each, but I had a 15% off coupon)
  • Box Cutter (not pictured)
  • Super Glue or Hot Glue Gun (Not Pictured)
1. First, if you have a 9"x12" cookie sheet, you'll need to cut the Lego plate to fit the cookie sheet. Using a box cutter, apply firm pressure in a straight line, to cut off about 3 rows of raised dots. I actually cut off four, but start with three. Note: You'll want to run the box cutter through two or three times. The plastic will actually break off where the cut was, creating a nice, even cut. My amazing grampa did the cutting for me. Because he's handy like that. And because I can't cut a straight line to save my life.


2. Next, use Super Glue or a hot glue gun to attach the Lego plate to the edge of the cookie sheet. You'll want to leave room for the magnetic containers on the side. Allow to dry.


3. Fill magnetic containers with Legos, and place on the edge of the tray. Apparently I turned my tray between pictures. It was a Monday night after a very long Monday. I have no explanation.

4. Now you can enjoy Legos while traveling, and not have to wonder how Wild Style's hair piece could have possibly jumped out of the car because you scoured every square inch of the backseat and found nothing save french fries that may be older than your youngest child. Again, not that I've ever done that, but just a helpful reminder. Because I care. 

Join our Facebook Community

Pin this!! 


Friday, June 20, 2014

Lego Patterns Travel Game--Free Printables

I've seen a bunch of these ideas floating around Pinterest lately, and figured it would be fun to make my own. Nearly-six-year-old Stinker loves building Legos, and my father-in-law made the kids an awesome Lego table for Christmas last year, so she's always working on something.

We're going to be traveling quite a bit this summer...a much needed family vacation followed by a wedding across the country. So, I wanted a few fun activities for the plane and car. This fun activity requires only 18 Lego bricks, and I have 10 free printable designs to keep your child occupied. Just show them the card, and have them use the bricks (list below on what you'll need) to match their design to the design on the card.

You'll Need These Bricks:
  • Orange: (1) 4x2, (1) 2x2
  • Dark Green (2) 4x2, (2) 2x2
  • Lime Green (1) 2x2
  • Dark Blue (1) 4x2, (1) 3x2, (1) 2x2
  • Red (1) 4x2, (2) 2x2
  • Yellow (3) 2x2
  • White (1) 2x2
  • Black (1) 2x2
Click each Photo Below, Right Click to "View Image", then Print each photo (there are 3). Laminate and cut out the squares and store them with your Lego bricks. 
 

Join Our Facebook Community

Pin This!!


Linked Up At: Not Just a Housewife

Popular Posts